Navigation: Developers' Guide >
How to Create an Add-On
This section contains information about how to create an Add-on in iVend Retail 6.6 - Extensibility Package. The Extensibility Package provides developers with Add-On Framework for creating an Add-On using their business logic that meet their goal.
Note
iVend Retail Add-on application can only customize iVend Management Console and iVend Retail POS.
iVend Retail Add-on framework cannot customize iVend Mobile POS, iVend e-Commerce solution, iVend Integration, iVend Replication or other components/services.
System Requirements
There are following system requirements for creating an Add-On:
oVisual Studio 2012/2013
Creating an Add-On
iVend Retail 6.6 - Extensibility Package provides developers with an Add-On Framework where they can develop an Add-On and incorporate the logic to achieve certain business requirements. Though, there should be a business scenario or business case based on which a developer creates an Add-on.
Business Case on for Add-On creation
A retailer wants to perform a validation if capturing customers billing address is mandatory before saving a customer.
Going through the below steps will help you understand how to implement a business logic when creating an Add-On.
To create an Add-On:
oCreate a new project by choosing "Class Library" as project type and name it SampleAddonForPO.
oNow open the Property tab.
To open the Property tab, right-click on the Project then click Properties.
oIn the Properties tab, keep the Assembly Name and Default Namespace value same as project name and save it.
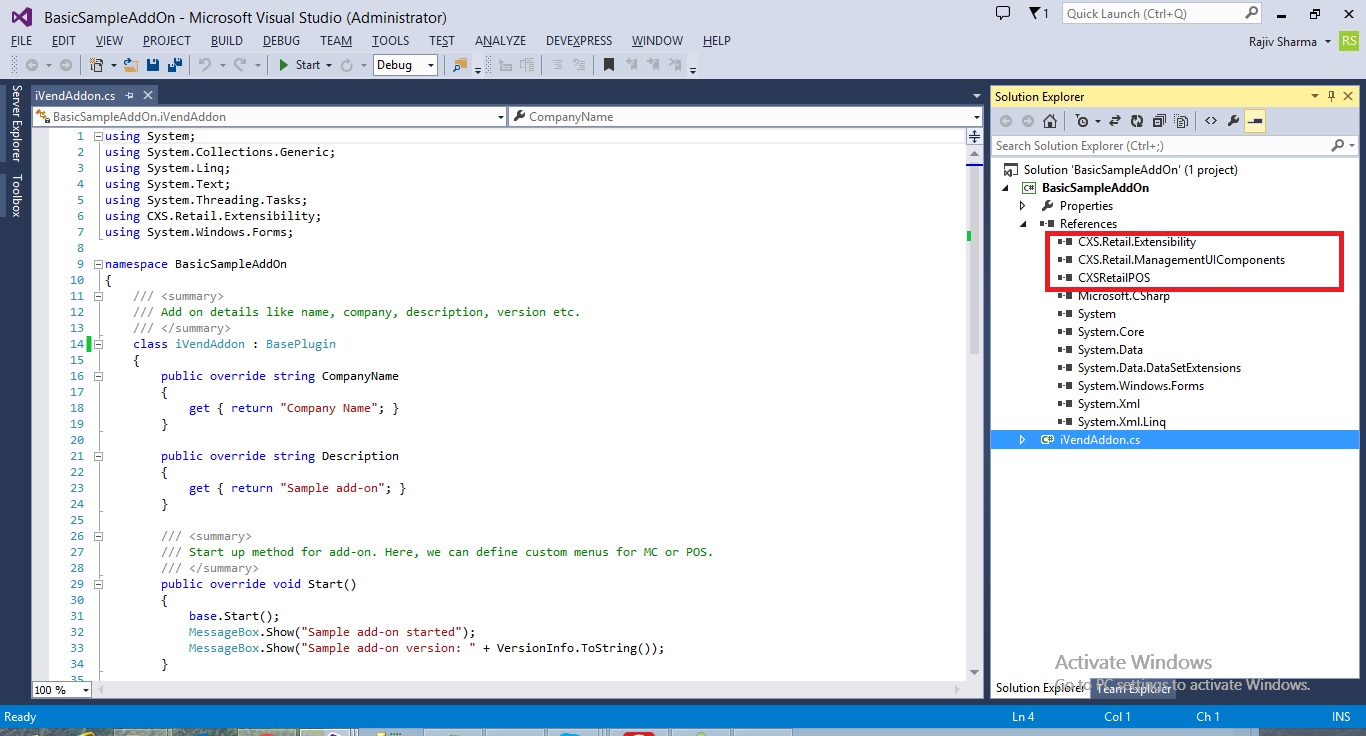
oAdd the following files in the project Reference:
§CXSRetailPOS.exe (To locate this file, go to <iVend Installation Directory>\PointOfSale)
§CXS.Retail.ManagementUIComponents.dll (To locate this file, go to <iVend installation directory>\ManagementConsole)
§CXS.Retail.Extensibility.dll (To locate this file, go to <iVend installation directory>\ManagementConsole)
|
oAdd a new class and let's name it "iVendAddOn.cs".
This is a basic plug-in class which contains version, name and other information.
oNow add another class to write your logic. Let's name the class AddingButtonsToPOScreen.cs.
oUse appropriate namespace as per the module required. We have used the "CXS.Retail.Extensibility.modules.purchasing" since we would like to extend the iVend Retail Management Console Purchase Order screen.
oNow inherit your class from "purchaseorderviewmodulebase" which will then make all the exposed events available for overriding.
oNow write the code for customization in the events.
oOpen the Configuration Manager and select x86 from the Active Solution Platform list for both mode Debug and Release.
oOnce you have set the appropriate configuration, build the solution.
oThen right-click on the Project and select Open Folder in File Explorer.
oBrowse the Bin > x86 > Release location and create a zip file containing the project DLL.
using System; using System.Collections.Generic; using System.Linq; using System.Text; using System.Threading.Tasks; using CXS.Retail.Extensibility; using System.Windows.Forms;
namespace SampleAddonForPO { public class iVendAddOn: BasePlugin { Version v1 = new Version(); public override string CompanyName { get { return "Citixsys"; } }
public override string Description { get { return "SampleAddonForPO"; } }
public override string Name { get { return "Sample Addon "; } }
public override Version VersionInfo { get { return v1; } } public override void Start() { MessageBox.Show("Started"); } } } |
using System; using System.Collections.Generic; using System.Linq; using System.Text; using System.Threading.Tasks; using CXS.Retail.Extensibility.Modules.Purchasing; using CXS.Retail.Extensibility; using CXS.Retail.ManagementUIComponents; using CXS.Platform.UIComponents; using DevExpress.XtraEditors; using System.Windows.Forms; using CXS.Framework.Core;
namespace SampleAddonForPO { class AddingButtonsToPOScreen : PurchaseOrderViewModuleBase {
public override void OnViewIntialized(object sender, ViewInitializedEventArgs args) { PurchaseOrderView POView = sender as PurchaseOrderView;
try { CXSButton cXSButton1 = POView.AddCustomButton("PO custom button 1"); CXSButton cXSButton2 = POView.AddCustomButton("PO custom button 2"); cXSButton1.Click += cXSButton1_Click; cXSButton2.Click += cXSButton2_Click; } catch (Exception e) { throw new CXSBusinessException(e.Message); } }
void cXSButton2_Click(object sender, EventArgs e) { MessageBox.Show("button 2 clicked"); }
void cXSButton1_Click(object sender, EventArgs e) { MessageBox.Show("button 1 clicked"); } public override void OnBeforeAddDetail(object sender, EventArgs<CXS.SubSystem.Purchasing.PurchaseOrder> args) { MessageBox.Show("Add On 2 before adding product."); } } } |
Note
POS works in offline mode if it is configured to function even if the connectivity between the terminal POS and the Store Server is interrupted.
In offline POS, CfgSyncTables is contains a list of all tables and complete structure. You can perform SQL operations in those tables and whenever the connection is established the data is updated on Store Server.
